
DIY NOEL Sign ~ Easy Christmas Decor
This December Silhouette Challenge is EPIC! You know, every month I have loved participating in this challenge. For this month’s challenge, I kept it simple with this DIY Noel Sign. This project is super easy, and perfect for the beginner. I promise!
Creating simple holiday decor with my Silhouette Cameo is an absolute must. To be fair, I don’t ALWAYS reuse my creations year after year. That is one thing I love ~ the time I put into something and the materials can be minimal, but create something perfect for whatever mood I am in. Some years, we completely change up our decor. Others, we pull out the same, favorite Christmas decorations.
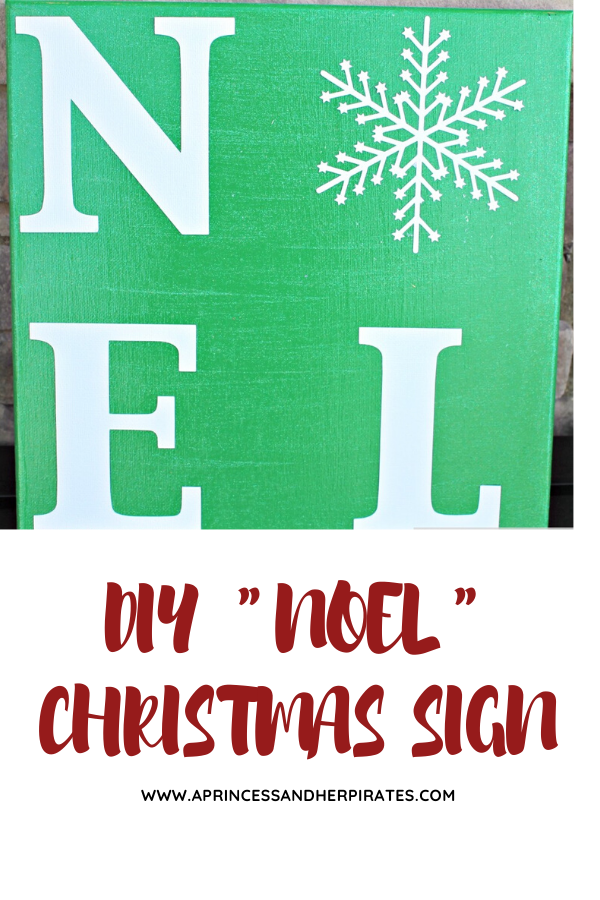
I created this simple addition to our holiday mantle using Silhouette Adhesive Backed Cardstock. Yep, it’s awesome. Although, I think just about anything Silhouette is awesome! It cut my snowflakes so intricately, and it sticks well to the canvas I painted. Now, it’s a part of our mantel! I love how my Silhouette can take simple materials and allow me to turn it into something impressive! My DIY Noel Sign adds a little pop of color to our overall red and gold decor theme.
Materials for a DIY Noel Sign
12×12 canvas
Green Paint {I used DecoArt’s Turf Green}
Deco Art Glamour Dust paint
Silhouette Adhesive Backed Cardstock
How to Make a NOEL Sign
First, coat the canvas with the bright green paint and allow it to dry overnight. It needs to be SUPER dry before you add anything to it.
Next, when the green is completely dry, give it a few coats of the Glamour Dust paint. This will give it some glitz and glitter!
Then, cut out the letters N, E, L from Silhouette Adhesive backed cardstock. Cut a snowflake for the “O”.
Finally, it is time to put it all together! After the glamour dust is dry, and you have the desired shimmer you want, adhere the NOEL to the canvas. I laid mind face down, with a glass vase on it overnight, to make sure the letters and snowflake would adhere well. When it was all in place, I added a thin coat of Mod Podge over it to seal it and give it a finished look.
I must be loving the snowflake theme this year, because I also cut snowflakes to add to my glass vases for my Christmas mantel! The adhesive backed cardstock is SO easy to use, and it’s so fun! Plus it comes in lots of fun colors, making it very easy to create custom projects.
Want to Check Out More Silhouette Projects?
My Silhouette Challenge buddies and I are all sharing projects on our blogs today, so peruse the projects below for a wealth of Silhouette inspiration!

- 2013 Snowman Christmas Card by Please Excuse My Craftermath…
- Christmas Hoop Art by Lil’ Mrs. Tori
- Silhouette Nativity Advent Candle Box by One Tough Mother
- Christmas Party Photo Booth Props by unOriginal Mom
- Another Stenciled Tea Towel by Cutesy Crafts
- Silhouette Gift Tags by Rain on a Tin Roof
- Snowflake Pin / Ornament by Coley’s Corner
- State Sign Couple Gift by It Happens in a Blink
- Mason Jar Christmas Ornaments by Vintage News Junkie
- Merry Christmas Wall Decor by One Artsy Mama
- Deer Head Holiday Banner…featuring Santa’s Reindeer by The Thinking Closet
- Restore your UGGS (with PAINT) by From Wine to Whine
- Monogrammed Snowflake Ornaments by Architecture of a Mom
- Christmas Countdown Sign by The Girl Creative
- Elf Chalk Sign: “The Best Way to Spread Christmas” by Weekend Craft
- Glittery Christmas Subway Art by The Turquoise Home
- Sketch Pen Labels by Sowdering About in Seattle
- Snowflake NOEL Sign by A Princess and Her Pirates
- DIY Holiday Hostess Gift by Everyday Paper
- Folding Nativity Backdrop by Chicken Scratch NY
- Recycled Glass Jar Advent Calendar by Nearly Handmade
- Reindeer Card: Double-Sided Print & Cut by GetSilvered
- Personalized Block Ornament by Suburble
- Paper Medallion Christmas Tree by Create & Babble
- Mini Mid-Century Homes by Tried & True
- Glitter and Vinyl Minecraft Christmas Ornament by A Tossed Salad Life
- DIY Countdown to Christmas Refrigerator Style by My Paper Craze
- Reversible Recipe Holder/Block Frame by The Sensory Emporium
- DIY: Lettered Christmas Pillows by The House on Hillbrook
- Simply Charming Christmas Ornaments by Life After Laundry
- No Glitter was Worn by GiveMeAPaintbrush
- Make Easy Ornaments from Paper Circles by Bringing Creativity to Life
- Cutting Machine Embroidery Applique by Terri Johnson Creates
- “Believe” Christmas Banner by Daily Dwelling
- DIY Christmas Nativity Card by Pitter and Glink
Happy Crafting and Merry Christmas!

I really like your sign! What a cute idea to use a snowflake as the “o”, it’s awesome sauce!
So cute! I love the green paint with the pop of white.. it’s crisp, holiday and for lack of a better word fun! Nice job.
I sure do love our group! Sooo much inspiration to take away and run with!! I have feared trying the adhesive cardstock, but think now I just might Can! Thanks for sharing this project!
Love this Sign! So pretty, I am in desperate need of some more Christmas decorations. So, I need to put something like this together soon.
Cute sign! Love the snowflake for the O.
I love your sign! I like the way you added some shimmer to it!
The sign is great! The silhouette is so addictive, isn’t it?!
I love the snowflake for the O and the pretty color green! Great job!
Terrific sign. Very clever to use the snowflake in the word, makes it even more festive!
Those boots are adorable!
Carrie, I love this sign with the snowflake!
Carrie this turned out so cute! I love the pretty green you chose and the snowflake is just gorgeous! Very festive 🙂
Love the snowflake for the O…I want one in my house, especially since I just explained to my kindergartener what “NOEL” was. 🙂
This project really packs a punch with the white lettering on the green canvas…the snowflake “o” is too cute! Great job, Carrie. Thanks for participating in our Special December Challenge & Giveaway! So glad you’re a part of our group.
How sweet! Great project for Christmas!
Still kicking myself for not ordering that adhesive backed cardstock. Great project!